August 2019
Skin Punch Biopsy: An overview for the Veterinary Nurse
By Christine Hackworth, RVT
Skin punch biopsy is a common diagnostic technique that can provide valuable information. Most skin biopsies are performed on a suspicious skin growth or on an area of skin that has failed to respond to treatment1. Depending on the size and severity of the lesion, the entire skin growth or a small section of skin can be removed and submitted to a veterinary pathologist, who will perform a histopathologic analysis.
There are many skin diseases that can be diagnosed by skin biopsy. Three examples are: cutaneous T-cell lymphoma, sebaceous adenitis, and pemphigus foliaceus. If possible, choose primary lesions such as papules, pustules, vesicles, macules or nodules.2,3 If an autoimmune disease is suspected such as discoid lupus erythematosus, select early depigmented lesions (before erosion or scarring occurs).2If primary lesions are not present, diagnostic information can be obtained from crusts, which should be carefully preserved with the skin biopsy samples2.
Skin punch biopsies can be done using a local anesthetic block, sedation, or general anesthesia. This is dependent on the area to be sampled and the patient’s temperament. Allow enough time for the local anesthetic to take effect before starting the biopsy. Time to effect is based on the individual patient, and can vary, and potentially may take up to 5-10 minutes3. Some patients will still demonstrate sensation due to the pressure on the skin from the punch.
Supplies
- Clippers and/or scissors
- 2% Lidocaine
- Skin punch biopsy
Punch biopsy sizes range from 2-8 mm, use a big enough size for largest possible sample. For most samples a size 6mm punch is used.
- Gauze
- Adison thumb forceps or 25-gauge needle
- Iris or small curved scissors
- Scalpel blade if performing a wedge biopsy
- Needle holder
- Non-absorbable suture material
- 10% formalin jar(s)
Procedure
- If the area to be sampled is haired, begin by either shaving (paying attention not to touch the skin) or using scissors to clip the hair shorter, being careful not to disturb any crusts, papules, or pustules.
- Infuse 2% lidocaine into the subcutaneous tissue. Inject enough lidocaine to form a small bump (usually 0.5 to 1 mL per site).
- In most instances the areas to be biopsied must not be prepped.
- The biopsy punch is applied to the center of the area to be sampled. If submitting a skin sample with a pustule on it, make sure the pustule is in the center of the biopsy taken.
- Rotate the punch with a turning motion in one direction (this will minimize any shearing artifact) with slight downward pressure (there is more turning then pressure). Once through the skin, remove the punch slowly, straight up. Again, being careful not to disrupt the sample.
- With forceps or 25-g needle, grasp just the edge of the sample (avoiding damage to the dermis) and pull the sample up and out. If using forceps do not grab the whole sample as this may crush the sample.
- With scissors cut as low on the stalk (underlying fat) as possible.
- Place the sample in 10% formalin immediately. Remember if a crust should fall off; be sure to also place that in the formalin jar.
- Place gauze on the biopsy site to remove excess blood.
- The biopsy site is closed with a non-absorbable suture. Usually a simple interrupted or a cruciate suture pattern is used.
- Repeat steps 3-9, replacing dull or used biopsy punches between samples.
Multiple lesions (3-4 representative areas) can be submitted in one formalin jar, unless otherwise noted by a veterinarian. When submitting lesions of different appearances in the same formalin jar, it is helpful to designate the separate samples with suture or some marking of each sample. Designate on the submitting paperwork how they are marked and what the sample is. Otherwise different samples can also be sent in separate formalin jars and labeled accordingly. Punch biopsies don’t need to be placed in a biopsy cassette.
If bacterial and/or fungal cultures are to be performed on a skin biopsy, the area can be lightly prepped by aseptic technique to remove any normal skin flora that may contaminate the sample, prior to taking the punch biopsy. The skin sample is then placed in a COPAN EswabTM. These swabs can be used for aerobic, anaerobic, and fungal tests.
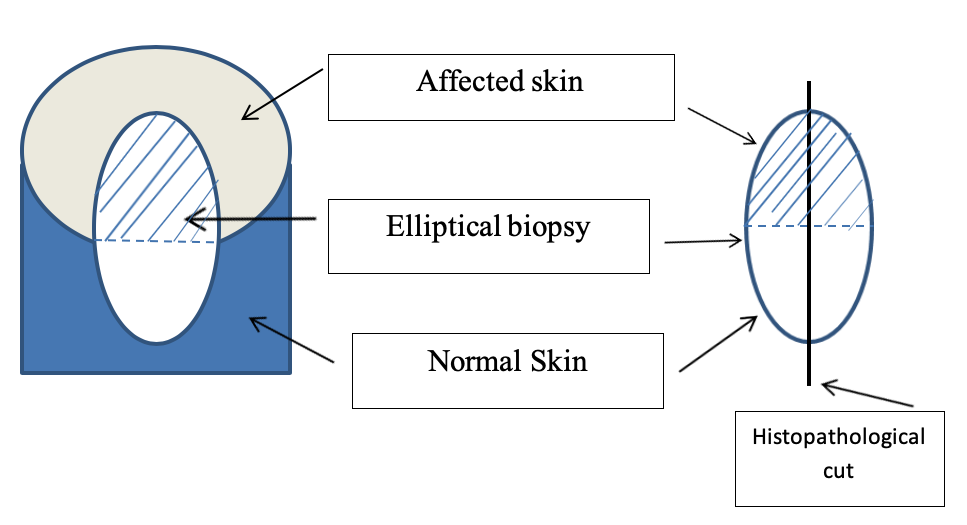
When punch biopsies are received at the histopathology laboratory it is routinely cut in half through the center. On occasion an area of transition (normal tissue and abnormal tissue) may be warranted. In these cases an incisional elliptical biopsy is taken. Then when the histopathology laboratory receives the sample, it is oriented and cut on the long edges of the elliptical biopsy (Fig.1).

|
| Fig. 1: Incisional elliptical biopsy comparing an area of transition (normal tissue to abnormal tissue.) |
It is also essential to give a complete signalment and history, including description and distribution of lesions; other clinical signs; the results of pertinent diagnostic tests; current or past therapy and the response to therapy; and your differential diagnoses. These elements are important to allow the pathologist to formulate an accurate diagnosis.2,3
References
- Hunter, Tammy DVM, Ward Ernest, DVM. Skin Biopsy in Dogs. VCA, Diagnosis, Pet Services. Available from: https://vcahospitals.com/know-your-pet/skin-biopsy-in-dogs
- Coyner, Kimberly S DVM, DACVD. Skills Laboratory: How to perform a skin biopsy. Want to optimize your chances of getting a diagnostic skin biopsy sample? Follow these easy instructions on obtaining and processing useful samples. DVM 360, 18 Oct 2011. Available from: http://veterinarymedicine.dvm360.com/skills-laboratory-how-perform-skin-biopsy
- Seltzer, Judith D. Skin biopsies in mammals. Lab Animal (2007) Vol. 36(4) page 23.
Christine Hackworth is a RVT in the Exotic and Dermatology sections of the Veterinary Health Center at the Kansas State College of Veterinary Medicine.
Next: Calving Season and Respiratory Disease
Return to Index